
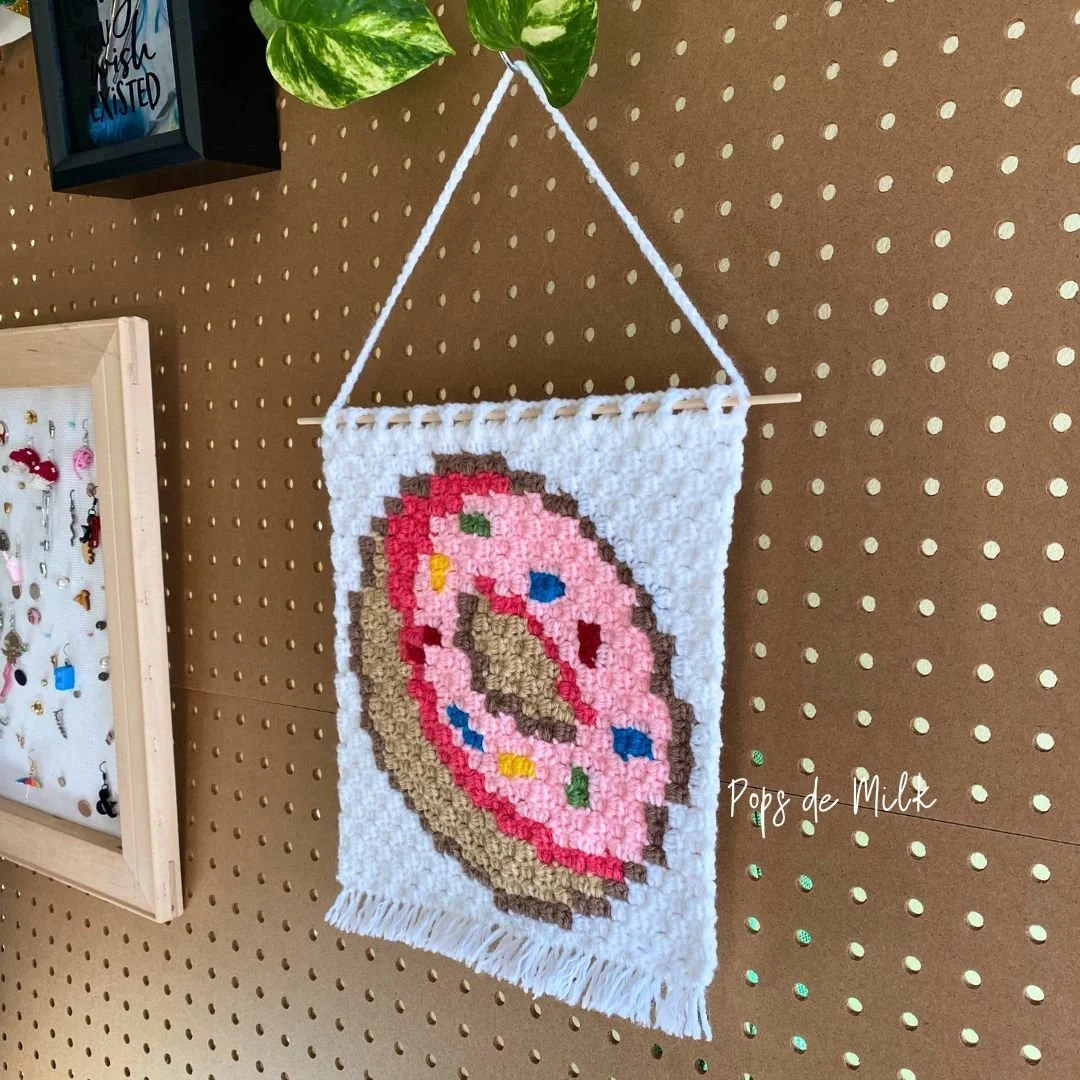
C2C Crochet Donut Wall Hanging
How to Create a Scrumptious C2C Crochet Donut Wall Hanging!
Today, I'm thrilled to share with you a scrumptious C2C crochet project that will have you craving both creativity and confectionery. Get ready to create your very own delectable donut wall hanging!

Materials
Worsted weight yarn in various donut-inspired colors. I’m using two shades of pink for the frosting, tan and brown for the donut base, and multiple colors for the sprinkles. For the background I’ve opted to use white.
Size 3.75mm crochet hook for the main panel, my favorite is this one by Clover
Size 3.25mm crochet hook for the hanging chain
Tapestry needle
Scissors
Wooden dowel or branch for hanging
Getting Started: Satisfying Your Crochet Cravings
As I stumbled upon this delightful project, I knew I had to bring it to life. The donut wall hanging, inspired by my love for all things sweet, seemed like the perfect addition to my cozy space. Plus, who can resist the temptation of a sugary treat in the form of a craft?
C2C Crochet Technique
To bring this donut wall hanging to life, we'll be using the Corner-to-Corner (C2C) crochet technique. This method creates a stunning textured design with diagonal squares that resemble the scrumptious layers of a real donut.
To make the C2C donut I used a perler bead pattern I found on Kandi Patterns:

Using the chart above, we'll work our way from the bottom right corner, building up each square to form the donut's mouthwatering shape. The C2C technique allows for flexibility, so feel free to experiment with colors and create your own unique flavor palette.
You can use the standard three double crochet cluster or you can use a two half double crochet cluster as I did for my donut wall hanging.
Assembling the Goodness: Finishing Touches
Once you've completed the C2C donut panel, it's time to add the finishing touches. Weave in any loose ends using a tapestry needle, creating a neat and polished appearance. To transform your donut into a wall hanging, attach it to a wooden dowel or branch using a simple slip stitch or your preferred method. For my wall hanging I worked a row of filet crochet stitches (*dc, ch 2, skip 2, rep from *) and threaded the dowel in between the chain spaces. To hang the panel I made a long chain with a smaller crochet hook.

You can also add a fringe by threading white strips of yarn and securing them with a knot. For my wall hanging I used a brush to unravel some of the strands and when I was happy with the look I used a rotoary cutter and a ruler to trim the excess. But you can leave the hanging without a fringe too, it will still look delectable!


Hang your delectable donut creation in a place of honor, whether it's your craft room, kitchen, or even a child's bedroom.
Remember, the beauty of this project lies not only in the finished result but also in the joy of the creative journey. So grab your crochet hook, choose your favorite flavors, and let's crochet our way to a wall hanging that's sure to satisfy your crafty cravings!
I hope you enjoyed this C2C Donut Wall Hanging and found it inspiring. If you make this crochet wall hanging I'd love to see your creation, just tag me on Instagram @popsdemilk_crochet and use the hashtag #popsdemilk
Looking for more C2C projects? Check these out:
**********
This pattern is for personal use only. The pattern and its photos may not be reproduced, distributed or resold, translated, published, altered, shared or posted in any way over the internet or offline.
You may sell finished items made from this pattern as long as it is handmade by you, not mass produced, giving the credit to Pops de Milk / Patricia Castillo as the designer. If you have any questions, you can email me at patricia@popsdemilk.com
This post contains affiliate links.