
How to Crochet a Filet Crochet Mesh Top
Over the past couple of months I've been doing my best to use up yarn from my scrap yarn stash and resist the urge to buy new yarn. And let me tell you, resisting this urge requires some serious will power! As I was working on these mesh tops I thought to myself, "Wouldn't it be awesome if I started a series called Scrap Style?" In this series, I focus on using what I have on hand to create slow fashion pieces. And just in time for summer I came up with this cute filet crochet top!
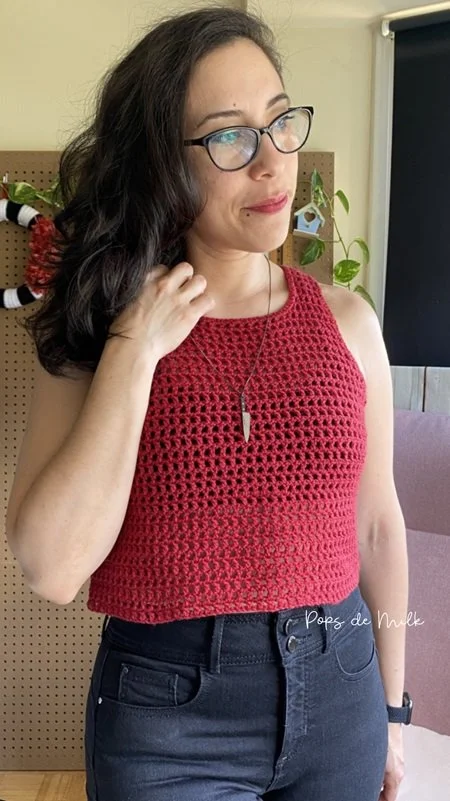
The great thing about challenging myself to not buy yarn and use what I have is that it forces me to think creatively and to be ok with mixing and matching different colors and even yarn types and weights. When I started this top I really wanted to use this red mystery yarn I had and when I ran out I took inspiration from my sandworm wreath and made the back with black and white stripes. I love how this turned out!
Filet Crochet Mesh Top
Crochet Top Pattern: "Made-to-Fit" Design
Skill Level: Easy
Materials
This top can be made with a variety of yarn weights but ideally you’ll want to use DK, lightweight, or light worsted weight yarn and an appropriate hook size. The red and striped top was made with a combination of worsted weight and light worsted weight yarns and a 4.00mm hook.
Yarn needle
Stitch marker
Measuring tape
Note app or notebook to write down your measurements
Gauge
Gauge is not critical for this project.
Abbreviations (US Terminology)
ch - chain
st(s) - stitch(es)
sk - skip
dc - double crochet
dec - decrease
yo - yarn over
Pattern Notes & Special Stitches
This pattern is designed to be "made-to-fit" or “made-to-measure,” allowing for customization based on your own measurements and preferences. Instructions are provided to guide you through the process of creating a versatile crochet top and I have included my measurements and the number of starting chains I used as an example.
Adjust the number of chains and stitches based on your measurements and preferences to achieve the desired fit.
This filet crochet pattern uses multiples of 2 plus 3 for the foundation chain.
The starting chain counts as a stitch.
Filet Crochet Decrease: yo, insert hook in the next st, yo, pull through 2 loops, yo, insert hook in next dc, yo, pull through 2 loops, yo, pull through remaining loops.
Taking Measurements
Measure the underarm to waist length or where you want the bottom hem to sit. For me this was approximately 8”.
Measure from your waist (or desired starting point) up to your shoulder where a shoulder seam typically sits. For me I measured from my natural waist to my shoulder seam and this was approximately 16”.
Measure the armhole area from shoulder to underarm following the natural curve of your shoulder/arm. For me this was approximately 9”.
Measure across your hips from side seam to side seam. For me this was approximately 19”.
Below is the pattern for the top I'm wearing in the photos, fit to my measurements but first here are step by step photos of what the stitches and fabric will look like.
To start, make the necessary number of chains:

Make the first dc in the 4th ch:

Make a chain:

Skip one chain and dc in the next chain:

Repeat the sequence of making a chain, skipping a chain, and making a dc in the next ch:
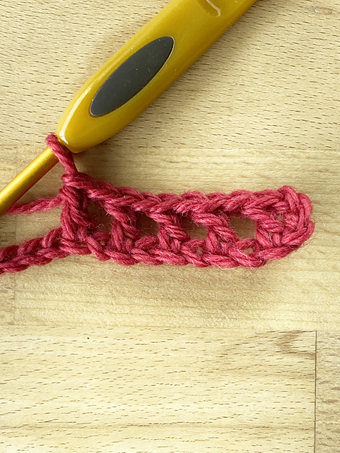
When you reach the end of the row, after making the last dc + chain 1 sequence, make a dc in the last two chains:

Filet Crochet Top Pattern
Again, note that the numbers below are for my measurements specifically. Be sure to measure yourself and adjust the numbers as needed.
Crochet Instructions
Using the hook and yarn of your choosing (see note in Materials list), create a foundation chain that matches the measurement of the bottom hem making sure it’s a multiple of 2 (plus 3).
Row 1: ch 93, dc in 4th ch from hook, *ch 1, sk 1 ch, dc in the next ch, repeat from * to last 3 chains, ch 1, sk 1 ch, dc in the last 2 chs, turn
Row 2: ch 3 (counts as dc), dc in the next st, *ch 1, sk 1 ch, dc in the next dc, repeat from * ending with ch 1, sk 1 ch, dc in the last 2 sts, turn
Repeat Row 2 until the piece measures approximately 9" or about 17 rows depending on your tension, yarn weight, and hook size. If you want a longer top continue adding rows until you are ready to start on the armholes.
Creating the Armholes
Filet crochet decrease at both ends of the row to setup for armhole shaping - ch 3, dec (see Filet Crochet Decrease), *ch 1, sk 1 ch, dc in the next dc, repeat from * to last 3 dc, don’t ch 1, dec, dc in last st, turn
Continue to decrease at the start and end of each row until the armhole measures approximately 5”.
Repeat Row 2 for approximately 2”.
Creating the Neckline and Straps
Determine where shoulder strap and neckline should begin and place a stitch marker. For my top I placed a marker on the 8th dc of the last worked row. Then work as follows:
1 - ch 3, (counts as dc), dc in the next st, *ch 1, dc in next st, repeat from * to 2 sts before marker, dec into the next 2 sts, dc in marked st, turn leaving remaining stitches.
2 - ch 3, dc in next st, *ch 1, dc in next st, repeat from * to last 3 dc, dec, dc in last st, turn
3 - ch 3, dc in next st *ch 1, dc in next st, repeat from * to end, dc in last 2 sts, turn
Repeat step 3 until you reach your desired strap height. Cut the yarn and weave in the ends.
Join yarn on the opposite side and repeat the steps to create the neckline and straps.
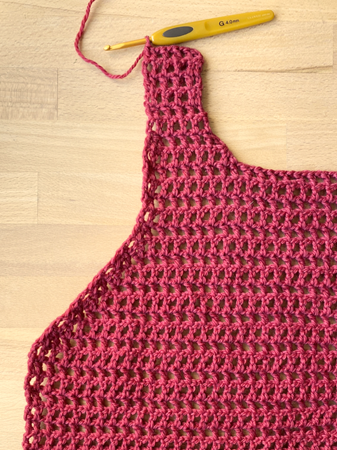
Here's what the top looks like after creating the armholes, neckline, and shoulders:
Finishing Touches
Depending on the yarn you used you may want to block your pieces before you sew the seams together.
To join the pieces, use a yarn needle and sew the shoulder edges together with right sides facing each other. Repeat the same with the side seams, working from the bottom hem and up the side to the armhole.
If you want you can join yarn and work single crochet stitches around the neckline and straps as well as the armhole edges to give your top a neat finish.


If you make this summer filet crochet top I would love to see your creation, just tag me on Instagram @popsdemilk_crochet
Looking for more crochet tops? Check these out:
**********
This pattern is for personal use only. The pattern and its photos may not be reproduced, distributed or resold, translated, published, altered, shared or posted in any way over the internet or offline.
You may sell finished items made from this pattern as long as it is handmade by you, not mass produced, giving the credit to Pops de Milk / Patricia Castillo as the designer. If you have any questions, you can email me at patricia@popsdemilk.com