
Ziggs, the Hexplosives Expert
I don't know if I've ever mentioned that Jason is an avid video game player, in particular, games like Starcraft and lately, League of Legends - he's a fan of Ziggs, the hexplosives expert. A few years ago I made him a pair of Zerg slippers - he was a happy man. The slippers have long since been replaced by more sturdy and functional ones - it's a little hard to walk when Zerg wings and limbs get stepped on.
Jason asked me to crochet his favorite League of Legends character, Ziggs. When I asked him if he wanted a cute amigurumi version, he said, "The character is cute enough as is, he's got a Cheshire cat smile." (But he's not a cat, he's a yordle. That confused me too). I did an image search for Ziggs and found a creature that has a Cheshire cat smile but is kinda creepy! And yet, pretty badass. But cute? Here he is: (image from League of Legends Wikia)

Okay, so maybe he does look cute especially with his little boots! It took me a few weeks to figure out the pattern and play around with shapes but I'm pleased with how this crochet Ziggs turned out. I'm especially happy with the bomb attachment. I was kind of dreading a few bits and pieces, like the goggles and the smile, but it was the bomb on his back that I left for last simply because I wasn't sure how to do it. I wanted to be able to take the bomb on and off so I sewed snap fasteners to his back strap and bomb, and one on his hand.
When I finally finished, Jason took one look at my creation and squealed. He's still squealing now.


Ziggs, the Hexplosives Expert
If you're a fan of Ziggs (or know someone who might squeal with delight at receiving one) here is the free pattern.
Size: Approx. 8.5” tall
Skill Level
Intermediate
Materials:
-Worsted weight (4) yarn such as Bernat Super Value in Taupe, Medium Navy, Kelly Green, Pumpkin, Dark Grey, Maroon, Walnut, Berry, Baby Pink, Gold.
-Size 3.75mm hook
-Needle for joining parts
-Fibrefill for stuffing
-White felt for teeth and bomb skull
-Needle and thread.
-Snap fasteners: 1 socket, 2 posts
Abbreviations (US terms)
Ch – chain
Sc – single crochet
Inc – 2sc increase in one st
Inc3 – 3sc increase in one st
Dec – decrease (sc2tog)
Hdc – Half double crochet
Dc – double crochet
Tr – triple (treble) crochet
BLO – back loop only
Sl st – slip stitch
Notes: Unless otherwise stated, this pattern is worked in continuous rounds using stitch markers to locate the beginning/end of a round. Work in somewhat tight stitches. All color changes start in the previous stitch.
Pattern
Head
With Taupe yarn.
Round 1: start 6 sc in magic ring
OR
Ch 2 and make 6 sc in 2nd ch from hook
Round 2: inc x 6 (12 sts)
Round 3: [sc, inc] x6 (18 sts)
Round 4: [sc 2, inc] x 6 (24 sts)
Round 5: [sc 3, inc] x 6 (30 sts)
Round 6: sc around (30 sts)
Round 7: [sc 4, inc] x 6 (36 sts)
Round 8: [sc 5, inc] x 6 (42 sts)
Round 9: sc around (42 sts)
Round 10: [sc 6, inc] x 6 (48 sts)
Rounds 11-12: sc around (48 sts)
Round 13: [sc 6, dec] x 6 (42 sts)
Round 14: [sc 5, dec] x 6 (36 sts)
Round 15: [sc 4, dec] x 6 (30 sts)
Round 16: sc around (30 sts)
Round 17: [sc 3, dec] x 6 (24 sts)
Round 18: [sc 2, dec] x6 (18 sts)
Begin to stuff with fiberfill.
Round 19: [sc, dec] x 6 (12 sts)
Round 20: dec x 6 (6 sts)
Fasten off, sew opening shut and weave ends.
Helmet
With Medium Navy yarn.
Round 1: Ch 21, sc in 2nd ch from hook and across (20 sts)
Rounds 2-9: ch 1, turn, sc across.
Ch 1, evenly sc along the side edge, ch 1, sc along bottom.
Fasten off and leave tail for sewing.
With Medium Navy yarn.
Round 1: ch 18, sc in 2nd ch from hook and across (17 sts)
Rounds 2-3: ch 1, turn, sc across.
Ch 1, evenly sc along the side edge, ch 1, sc along bottom.
Fasten off and leave tail for sewing.
With Berry yarn.
Round 1: ch 17, sc in 2nd ch from hook and across to end, in last ch [sc, ch, sc], continue to sc on bottom side of ch across.
Fasten off and leave tail for sewing.
You will have three long rectangles. Stack them on top of each other with biggest on the bottom and red strip on top. Use yarn tail on red strip to sew all three pieces together.
Goggles
With Kelly Green yarn.
Round 1: start 6 sc in magic ring
OR
Ch 2 and make 6 sc in 2nd ch from hook
Round 2: [inc, sc] x 3 (9 sts)
Fasten off and weave ends.
With Pumpkin yarn, pick up stitch (does not count as sc).
Round 3: [sc, inc] x 4, sc in same join st (13 sts)
Round 4: sc in BLO
Fasten off and weave ends.
Goggle Middle Strap
With Pumpkin yarn.
Ch 4, sc in 2nd ch from hook to end.
Fasten off and leave tail for sewing.
Helmet and Goggle Assembly:
Use safety pins to help guide you in attaching parts to the head. With yarn tail from bottom helmet piece, sew on to head. Make sure to attach goggles as you go along. Use a little fiberfill to stuff goggles but not too much.
Ears
With Taupe yarn.
Round 1: start 6 sc in magic ring
OR
Ch 2 and make 6 sc in 2nd ch from hook
Round 2: sc around (6 sts)
Round 3: [inc, sc] x 3 (9 sts)
Round 4: sc around (9 sts)
Round 5: [inc, sc 2] x 3 (12 sts)
Round 6: sc around (12 sts)
Round 7: [inc, sc 3] x 3 (15 sts)
Round 8: sc around (15 sts)
Fasten off and leave tail for sewing.
Earring
With Gold colour yarn.
Ch 10, sc in 2nd ch from hook and across to end. Fasten off and leave tail for sewing to left ear.
Teeth and Nose
Use felt to cut out smile shape and then use thread to stitch teeth detail or just leave blank. Sew teeth to face.
Use Baby Pink yarn to embroider nose.
Beard
With Taupe yarn.
Round 1: ch 31, join with sl st. Do not turn, continue around.
Sts in round 2 are worked around ch not through V’s, as pictured.
Round 2: 4 sc, hdc, 3 dc, sc, 3 dc, hdc, 8 sc, hdc, 2 dc, tr, ch, tr, ch, 2 dc, hdc, 5 sc.
Fasten off and leave tail for sewing. Brush the beard to give it a fuzzier look. Sew over teeth in a Cheshire cat-like smile.
Torso
With Dark Grey yarn.
Round 1: start 6 sc in magic ring
OR
Ch 2 and make 6 sc in 2nd ch from hook
Round 2: inc x 6 (12 sts)
Round 3: [inc3, sc 2] x 4 (20 sts)
Round 4: sc, inc, [sc 4, inc] x 2, sc 3, inc, sc 2 (24 sts)
Rounds 5-6: sc around (24 sts)
Round 7: sc 2, inc, [sc 5, inc] x 2, sc 5, inc, sc 3 (28 sts)
Rounds 8-13: sc around (28 sts)
Round 14: sc 4, dec, [sc 5, dec] x 2, sc 5, dec, sc (24 sts)
Round 15: [sc 2, dec] x 6 (18 sts)
Round 16: [sc, dec] x 6 (12 sts)
Round 17: dec x 6 (6 sts)
Fasten off, sew opening shut and leave tail for sewing head to torso.
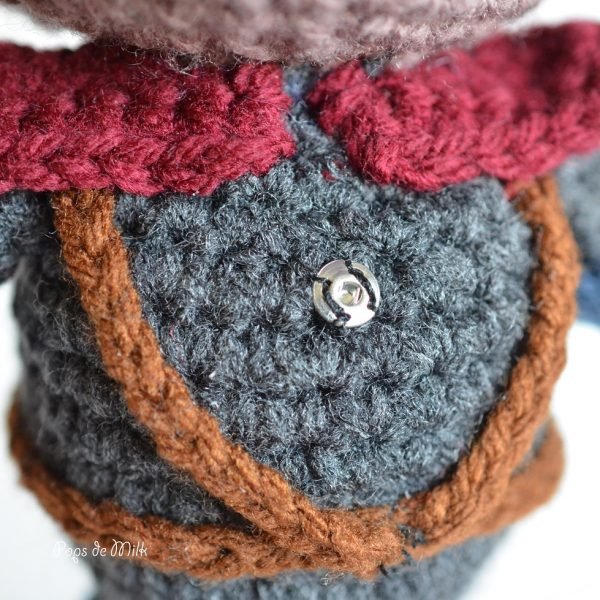
Chest Armour and Straps
With Medium Navy yarn.
Round 1: ch 9, sc in 2nd ch from hook and across (8 sts)
Round 2: ch 1, turn, sc across (8 sts)
Round 3: ch 1, turn, skip 1st st, sc across, skip 2nd last st, sc in last st (6 sts)
Rounds 4-5: ch 1, turn, sc across (6 sts)
Round 6: ch 1, turn, skip 1st st, sc across, skip 2nd last st, sc in last st (4 sts)
Round 7: ch 1, turn, sc across.
Fasten off and leave tail for sewing.
With Walnut yarn.
Middle strap: Ch 30, sc in 2nd ch from hook and across. Fasten off and leave tail.
Shoulder straps (make 2): Ch 20, sc in 2nd ch from hook and across. Fasten off and leave tail.
Shoulder Pads – Make 2
With Maroon yarn.
Round 1: ch 7, sc in 2nd ch from hook and across, 3 sc in last ch, continue to sc along bottom ch.
Round 2: ch 1, turn, sc 5, inc in next 3 sts, sc in remaining sts.
Fasten off and leave tail for sewing.
Arms
With Walnut yarn.
Round 1: start 6 sc in magic ring
OR
Ch 2 and make 6 sc in 2nd ch from hook
Rounds 2-3: sc around (6 sts)
Switch to Dark Grey yarn.
Rounds 4-10: sc around.
Fasten off and leave tail for sewing.
Arm Shields
With Medium Navy
Hand Shield – Make 2
Round 1: ch 4, sc in 2nd ch from hook to end.
Round 2: ch 1, turn, sc across.
Fasten off and leave tail for sewing.
Arm Shield – Make 2
Ch 11, sc in 2nd ch from hook and across to end. Fasten off and leave tail for sewing.
Chest Armour Assembly:
Sew middle strap to chest armour. Slip onto torso and then attach shoulder straps to top corners of chest armour. Bring shoulder strap ends to back of torso and join to middle strap, making a stitch into torso to secure. Use yarn tail from chest armour to sew onto torso.
Arms and Shield Assembly:
Once chest armour is attached, sew arms in place. Attach shoulder pads on top. With arms and shoulder pads attached, sew head onto body using yarn tail from torso. Sew hand shield over brown portion of arm. Wrap arm shield around arm and stitch in place. Use Berry yarn to embroider arm shield cables.
Bomb
With Medium Navy yarn.
Round 1: start 6 sc in ring.
Round 2: [inc, sc] x 3 (9 sts)
Round 3: sc in BLO
Fasten off and leave tail for sewing. Cut a piece of gold yarn and tie a knot on one end. Pull through centre top of bomb piece and fray a bit to look like sparks.
With Maroon yarn.
Round 1: start 6 sc in ring.
Round 2: inc in each st (12 sts)
Round 3: [sc, inc] x 6 (18 sts)
Round 4: [sc in next 2 sts, inc] x 6 (24 sts)
Rounds 5-7: sc around.
Round 8: [sc in next 2 sts, dec] x6 (18 sts)
Round 9: [sc, dec] x 6 (12 sts)
Stuff with fiberfill.
Round 10: dec x 6 (6 sts)
Fasten off and sew opening shut. With white felt, cut out skull shape and sew to bomb and embroider other detail. If your felt skull breaks apart (as mine did) you can use craft glue, like Mod Podge, to keep it in place. Attach snap fastener to bomb, hand (palm), and back of torso. Alternatively you can just sew the bomb to back.
Legs
Shoes and Leg Armour
With Medium Navy
Shoe Top – Make 2
Round 1: ch 6, sc in 2nd ch from hook and across to end.
Round 2: ch 1, skip 1st st, sc, skip next st, sc in last st.
Round 3: ch 1, skip 1st st, sc to end.
Round 4: ch 1, skip 1st st, sc.
Fasten off and leave tail for sewing.
Shoe Bottom – Make 2
Round 1: ch 6, sc in 2nd ch from hook and across, sc 3 in last ch, cont to other side of ch to end (11 sts)
Round 2: ch 1, turn, sc 5, inc, sc 5 (12 sts)
Fasten off and weave ends.
Leg Armour – Make 4
Round 1: ch 5, sc in 2nd ch from hook and across to end.
Round 2: ch 1, sc to end.
Rounds 3-4: repeat round 2.
Fasten off. Leave tail on 2 and weave ends on the other 2.
Legs – Make 2
With Dark Grey
Round 1: start 6 sc in ring.
Round 2: [sc 2, inc] x 2 (8 sts)
Rounds 3-11: sc around (8 sts)
Fasten off and leave tail for sewing to body.
If you make this League of Legends crochet pattern I'd love to see your creation, just tag me on Instagram @popsdemilk_crochet and use the hashtag #popsdemilk
**********
This pattern is for personal use only. The pattern and its photos may not be reproduced, distributed or resold, translated, published, altered, shared or posted in any way over the internet or offline.
You may sell finished items made from this pattern as long as it is handmade by you, not mass produced, giving the credit to Pops de Milk / Patricia Castillo as the designer. If you have any questions, you can email me at patricia@popsdemilk.com