
Sailor Moon Amigurumi Crochet Pattern
Last week I made a pattern for Sailor Moon's Crystal Star, which Little Sister Sue wore as a pin to Anime North. She was very happy with it. Of course after making the pin I couldn't stop thinking about making a Sailor Moon amigurumi crochet pattern. I wanted to make something cute and chibi-like and here's what I came up with:
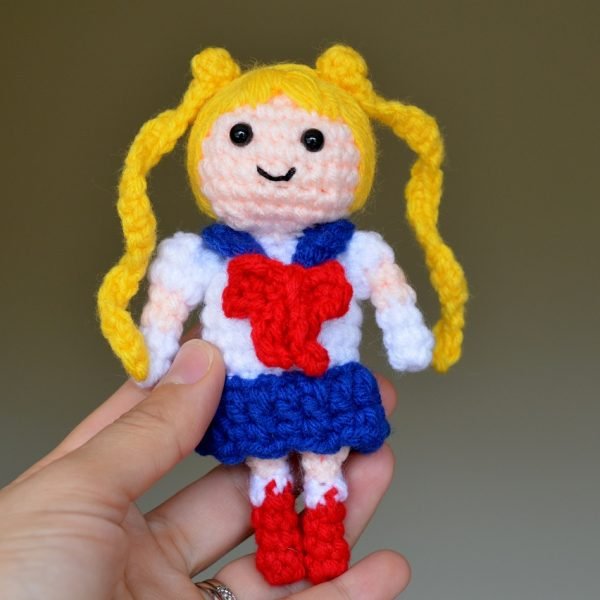
I wanted the legs and arms to be super tiny in comparison to the body so I used a small hook and a very tight stitch. Also, notice the boots? I used that "ugly" jog in crochet colour change to make the pointy bit at the top of the boot.
The hair, surprisingly, was easy to do but it took a bit of time and patience. I'm pretty happy with how it turned out :)
I think my favourite part about this amigurumi is the hair. When I first started making Sailor Moon I purposely left the head for last because I was a bit unsure as to how I would get it done. Was my first time adding hair in that style and the buns - or meatballs, as Darien called them - came out better than I expected. Good things learned in this project!

Crochet Sailor Moon Amigurumi Pattern
Approx. Size: 5” tall
Materials:
Worsted weight (4) yarn such as Bernat Super Value in Peach, Royal Blue, White, Yellow, Berry
Size 3.00mm hook
Needle for joining parts
Safety eyes, size 6mm*
Polyfil for stuffing
Embroidery thread and needle
Notes: Unless otherwise stated, this pattern is worked in continuous rounds using stitch markers to locate the beginning/end of a round. Work in somewhat tight stitches. All colour changes start in the stitch of the previous round.
*Safety eyes pose a choking hazard to children under 3 years of age. If you are giving this to a child under 3, you can embroider the eyes instead of using safety eyes
Abbreviations (US terms)
Ch – chain
Sc – single crochet
Dc – double crochet
Inc – increase (2sc in same st)
Dec – decrease (sc2tog)
Sl st – slip stitch
BLO – back loop only

Head
With Peach
Round 1: Start 6 sc in magic ring OR ch 2 and sc 6 in 2nd ch from hook.
Round 2: inc in each st (12 sts)
Round 3: (sc in next st, inc in next st) repeat 6 times (18 sts)
Rounds 4: (sc in next 2 sts, inc in next st) repeat 6 times (24 sts)
Round 5: sc in each st (24 sts)
Round 6: (sc in next 3 sts, inc in next st) repeat 6 times (30 sts)
Round 7: sc in each st (30 sts)
Round 8: (sc in next 3 sts, dec) repeat 6 times (24 sts)
Round 9: sc in each st (24 sts)
Round 10: (sc in next 2 sts, dec) repeat 6 times (18 sts)
Round 11: (sc in next st, dec) repeat 6 times (12 sts)
Attach eyes, sew hair with yellow yarn (as pictured), stuff with fiberfill.
Round 12: dec 6 times (6 sts)
Fasten off and leave long tail for sewing. To close opening make a few stitches around and pull close like a drawstring purse. Attach head to body last.
Buns
With yellow yarn
Round 1: Start 6 sc in magic ring OR ch 2 and sc 6 in 2nd ch from hook.
Round 2: sc in each st (6 sts)
Round 3: ch 20, sc in 2nd ch from hook and each ch back down to bun, sl st and fasten off. Leave tail to sew.
Legs/Body
With Berry
Round 1: Start 5 sc in magic ring OR ch 2 and sc 5 in 2nd ch from hook.
Rounds 2-4: sc in each st (5 sts)
Switch to white yarn in last st
Round 5: sc in each st (5 sts)
Switch to peach yarn in last st
Round 6: sl st in BLO
Round 7: sc in BLO
Round 8: sc in each st
Fasten off. Make second leg but do not fasten off.
Round 9: Join legs and switch to white yarn, inc in each st (20 sts)
Round 10: sc 4, dec, sc 8, dec, sc 4 (18 sts)
Rounds 11-16: sc in each st (18 sts)
Round 17: (sc in next st, dec) repeat 6 times (12 sts)
Begin to stuff with fiberfill.
Round 18: dec 6 times (6 sts)
Fasten off and sew opening shut (same as head).
Skirt
With Royal Blue
Ch 20, sl st to first ch to form ring. Ch 3, dc in 3rd ch from hook and around making sure not to twist ring. Sl st to top of starting ch.
Ch 2, sc in 2nd ch from hook, ch 2, * sc, ch 2 * around.
Fasten off and leave long tail for sewing.
Arms
With White
Round 1: Start 5 sc in magic ring OR ch 2 and sc 5 in 2nd ch from hook.
Rounds 2-3: sc in each st (5 sts)
Switch to peach in last st.
Rounds 4-5: sc in each st (5 sts)
Switch to white in last st. The following increases create the cap sleeves.
Round 6: inc 5 times (10 sts)
Round 7: sc in each st (10 sts)
Fasten off and leave tail for sewing. Sew a few stitches (same as head closure) to give sleeves a more rounded shape.
Bow
With Berry
Row 1: Ch 6, sc in 2nd ch from hook and across (5 sts)
Row 2: Ch 1, sc across
Row 3: Ch 1, sl st, ch 4, sc in 2nd ch from hook and each ch back to base, sl st in next st, ch 4, sc in 2nd ch from hook and each ch back to base, sl st in next st and to end.
Fasten off and leave long tail. Wrap yarn in the middle to create bow shape.
Sailor Collar
With Royal Blue
Row 1: ch 8, sc in 2nd ch from hook and across (7 sts)
Row 2: ch 1, sc across
Row 3: ch 7, sl st in 2nd ch from hook, sc, sc, hdc to end, sl st in next st to end, repeat to make other side.
Fasten off and leave long tail.

If you make this crochet Sailor Moon amigurumi I'd love to see your creation, just tag me on Instagram @popsdemilk_crochet and use the hashtag #popsdemilk
Looking for more crochet anime projects? Then you might like these:
**********
This pattern is for personal use only. The pattern and its photos may not be reproduced, distributed or resold, translated, published, altered, shared or posted in any way over the internet or offline.
You may sell finished items made from this pattern as long as it is handmade by you, not mass produced, giving the credit to Pops de Milk / Patricia Castillo as the designer. If you have any questions, you can email me at patricia@popsdemilk.com